operations
Celery
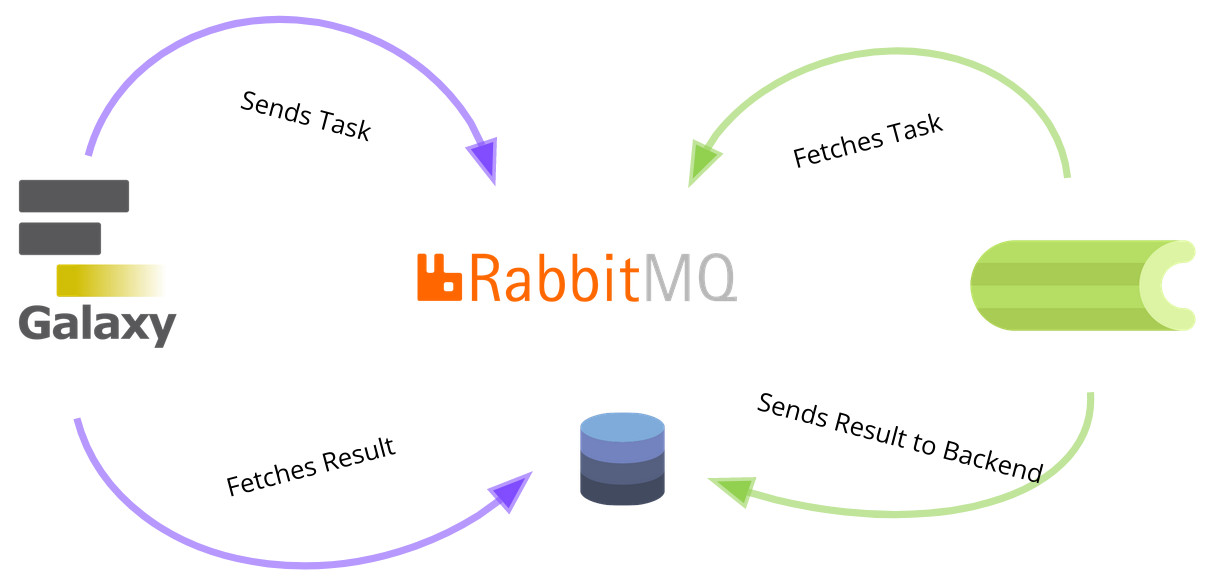
Celery is an asynchronous python task queue, which executes tasks in realtime. This helps Galaxy by offloading many background and I/O tasks to separate python processes which can run on separate machines. Additionally it saves time because the python processes keep running instead of getting launched and removed every time. Celery is well documented and widely used.
How it works
See also this presentation in the training material. (It should be updated soon)
How to use it
Chapter One: Down the Rabbit Hole
Enter the Rabbit Hole, if you haven’t already! You should set up a message queue server, preferably RabbitMQ. It should be either in a private network (such as a Wireguard VPN) or use SSL encryption and strong passwords. You can use our role for a Docker RabbitMQ container. Once you have your Rabbit up and running, try and add it’s amqp URL to the galaxy.yml
amqp_internal_connection: pyamqp://user:strongpw@mq.example.com:5671/galaxy?ssl=1
If you can see galaxy connecting to your rabbit in the RabbitMQ dashboard, you know it worked. By the way, we dont need to specify the database for celery, because it should be already in the config file. (As URL, not as socket!)
In order to protect our Rabbithole from unwanted visiors, we decided to put it behind a reverse proxy, called traefik.
The address mq.galaxyproject.eu points to this proxy. To reach the RabbitMQ itself, try mq02.galaxyproject.eu or mq.bi.privat.
This is necessary for SSH or to view the dashboard.
Sometimes the space gets very tight in the rabbit hole and you find files that are large, even up to multiple GB:
14GB /opt/rabbitmq/data/mnesia/rabbit@mq02/msg_stores/vhosts/D9TR3BK9230KDSJSHK8SQ6Y7XE7R/queues/73X2Y1RGJSKAJOJHXAIOVHM
But beware make sure you are cutting the right ties here, this file could be important for Galaxy to function. To see if it actually belongs to a galaxy queue use this erratic Erlang snippet and try galaxy internal and external, then compare the resulting path:
mq02:/# rabbitmqctl eval 'VHost = <<"galaxy">>, QName = <<"galaxy.internal">>, VDir = rabbit_vhost:msg_store_dir_path(VHost), <<Num:128>> = erlang:md5(<<"queue", VHost/binary, QName/binary>>), QDir = rabbit_misc:format("~.36B", [Num]), filename:join([VDir, "queues", QDir]).'
Chapter Two: The Red Queen
Set up a node on which you want to run Celery. This node has to get access to your database.
In case of PostgreSQL you should edit the postgresql_pg_hba.conf and add the IP of your new Celery node (or manage everything nice and clean with Tailscale, in this case you can just add the Tailnet IP address)
host galaxy galaxy 100.118.169.0/24 md5
Be careful with the numbers! “I see what I eat” is not the same thing as “I eat what I see”! 10 is not a 100 and you know what the red queen does when you mess it up! Another thing that enrages her, is when you do not restart the Celery workers, after you changed something in your Galaxy instance. (update, code, config…)
Chapter Three: The Secret Garden
The rabbit led you in the wonderland of asynchronous Python tasks, you are now ready to install celery on your second node.
Keep in mind that Celery needs access to all Galaxy configuration, app code and all the python packages in the .venv folder to grow and..sorry, execute the tasks correctly. The easiest way to achieve that is to rsync/nfs/.. the whole galaxy directory to your new Celery node.
Now you can source /path/to/galaxy/venv/bin/activate and start your workers with a command like this:
$ cd /path/to/galaxy/ #Celery has to find the galaxy.celery app
$ PYTHONPATH=/path/to/galaxy/lib
$ /path/to/galaxy/venv/bin/celery --app galaxy.celery worker --concurrency 32 -n worker --loglevel DEBUG --pool threads --queues celery,galaxy.internal,galaxy.external
For better experience I recommend our Systemd Ansible Role.
Chapter Four: The Talking Flowers
To be able to watch your Celery tasks grow and monitor it’s behavior, you can talk to the Flower.
It’s a beautiful Celery dashboard, installable with pip or by using another convenient Ansible role. Flower needs the same access to packages, paths and folders as Celery workers and additionally it’s RabbitMQ user needs to have at least monitoring permission for the galaxy queue. In order to access the dashboard, you need to be in the same Tailscale network or use SSH tunneling.
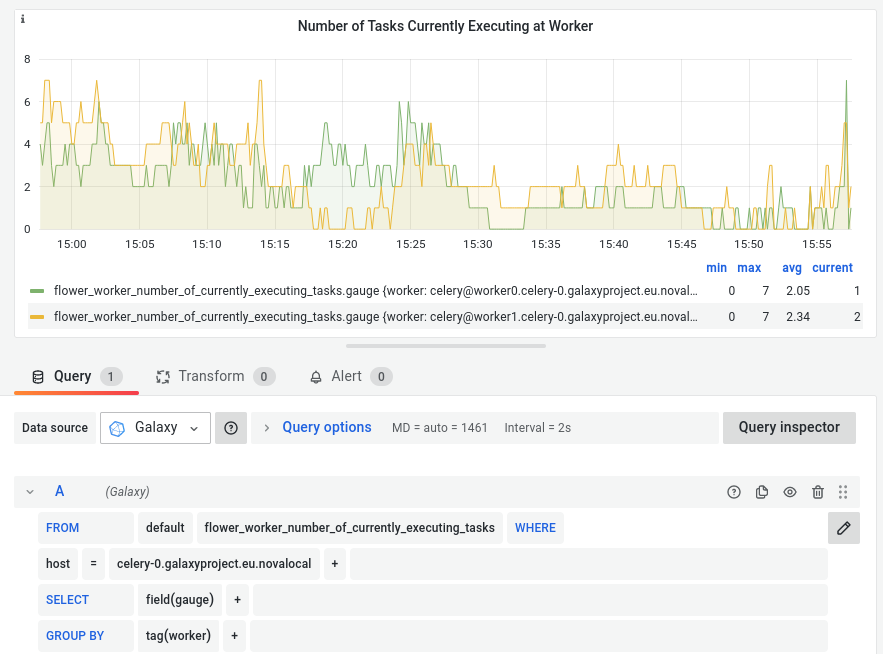
Chapter Five: Be On Good Terms With Time
Having time on you side makes life easier, right? You can easily do that by using InfluxDB and import all your information you got from Flower directly with Telegraf. All you have to do is specify
[[inputs.prometheus]]
    urls = ["http://127.0.0.1:5555"]
in your /etc/telegraf/telegraf.conf.
when you set up your Telegraf/InfluxDB/Grafana Stack correctly, you should be able to create Celery panels like this (or better):